Harvest and Store Your Sweet Potato Crop Efficiently
Store and make bigger profit from a high demand market for your potatoes.
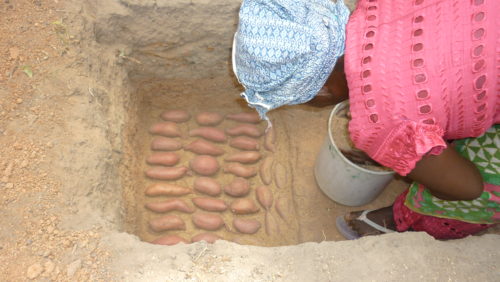
There is a better way to store harvested sweet potatoes in dry cool sand to prevent rotting and spread of disease and pests for many months. It is a better way to save your potatoes for future high demand markets instead of selling them at lower prices with high supply markets as traditionally done.
Harvesting Sweet Potatoes
- Choose a day when it hasn’t rained for a few days, this is when the soil is minimally moist and crumbly, and you can brush off the tubers with a very light touch.
You don’t want mud caked onto the potatoes. It makes them harder to clean and store.
The harvesting process starts with cutting the vines back so you can get to the soil. Growing sweet potatoes on a trellis makes it easier to follow the vines and find the location of the tubers.
Cut off the vines, leaving six-inch lengths above ground as a sweet potato beacon.
2. Carefully and slowly push away the soil to reveal the potatoes. Remember that potato skins are thin and delicate to damage if not approached gently.
Then loosen the soil around the tuber, digging under it to lift it out gently. You can use the hori hori garden knife.
Harvesting sweet potatoes is not enough itself. It is recommended to also cure the potatoes. It’s hard to wait, but the curing process really sweetens them up.
Curing Sweet Potatoes
Curing is a necessary step that sweetens the flavor and allows the skins to harden for optimal storage. Be patient and don’t rush the process!
The first step for curing sweet potatoes lasts about 10 days, and the second step lasts about six weeks.
Step 1:
This first step for curing sweet potatoes heals any damage that occurred to the tubers during harvest so they store longer. It also kicks off sugar production to give you sweeter tubers.
For this step, the ideal scenario is an 85-degree room with 85% humidity. What? You don’t have that?!
My solution for years now is this: Punch a few holes in plastic grocery bags and fill them with a single layer of tubers in each bag. Tie the bags closed and put them in your sunniest, warmest window. This creates a sort of greenhouse effect.
Leave for 10 days.
If it gets chilly and your windows are drafty, put a blanket or towel over them to keep them warm.
After 10 days, open your plastic bags of curing tubers. They should be moist and much harder to the touch. Compost any soft ones.
While you can technically cook your sweet potatoes now, continuing with this next step kicks off even more sugar production and prepares them to store even longer.
Step 2
Curing for up to 6 more weeks makes the sweetest sweet potatoes.
Roll up each tuber separately in a single sheet of newspaper, stacking them in a cardboard or wooden box, or any breathable storage container. Place it in a basement or other room where the temperature is close to 55-60° F, for six weeks.
This six-week period develops the hard skin necessary for long term storage, and kicks off even more sugar production. The newspaper allows aeration and prevents moisture build-up that could otherwise ruin the harvest.
Storing Sweet potatoes
After curing, you can store them for 6-8 months in ideal conditions:
- Breathable container or mesh bag
- Cool temperature, around 55° F
- Dark
- Around 60% humidity
Check this video for an easy and cost effective technique https://sawbo-animations.org/1647
Actual storage length depends on post-harvest conditions. The process for harvesting, curing, and storing sweet potatoes sounds complicated and time-consuming, but really it’s simple once you get the hang of it.